Some Things to Check When One Channel from a
Turntable Appears Dead or Hum Is Present
The following information is related specifically to our CVS models of
turntables, however, much applies to turntables in general.
It is best to just analyze the turntable with only an amplifier, and
without any other equalizer, tape decks, etc. involved. First, you may be
able to try another amplifier and see if the problem goes with the turntable. If
it does not, the turntable is OK. If it does, try the following:
Basic Testing Without An Instrument (This info will be useful for us
if you have a problem)
1. Is there equal sound produced by both channels?
The following would tell us that the switch is basically connected correctly
internally.
2. Set you amplifier to play "MONO". If your amplifier does not have a
MONO switch, use a "Y" connector to connect the two RCA output cables together,
and connect that to either L or R phono input of your amplifier. Yes connect the
ground wire as you normally would.
3. Play a mono record.
4. With the V/S switch set to Stereo. You should hear clear normal volume sound
from the record. (maybe with that dreaded hum)
5. With the V/S switch set to Vertical, you should hear greatly reduced sound.
(maybe with that dreaded hum)
Here is how to check if under deck ground connection from the arm to the
outputs are connected.
1. You will need a wire that has metal contact at both ends. For instance, any
RCA cable. You will use the center connector of one end and the center connector
on the other end (if stereo cable, one channel only).
2. Take notice of the volume of the hum.
3. Now touch one end of the wire to a bright shinny metal part of the arm tube,
and touch the other end to the ground terminal or a shinny metal part of your
amplifier.
4. If the hum goes away. The is a bad ground connection in the turntable or
possibly a bad crimp connection at the turntable's output ground wire right at
your amplifier.
Testing With An Instrument (Ohmmeter)
1) You should have the phono pickup cartridge mounted in its headshell, and
that mounted on the arm as for normal use.
2) Use an Ohmmeter and measure the resistance across each output lead.
That is from the RCA plug center prong to its outer ring. This requires a
little manipulation of the test leads. You should expect to measure 200 to
600 Ohms. If much greater, like 10,000 Ohms, there is an open circuit
somewhere as explained below. A sensitive continuity checker might be used
and you would hope to see good continuity.
3) Operate the Vertical/Stereo switch. The resistance (continuity)
should not change.
Headshell Causes
1) Try substituting a known-good cartridge/headshell. Maybe you can
borrow one. If it works, then the problem is with yours.
2) Film on the rear arm connectors can cause an intermittency. Remove
the headshell, and rub the rear-end connectors on a piece of clean cloth for
about 10 seconds. Replace the headshell and check sound.
With stubborn cases, you may have to get a long bristled
brush (stiff if possible) and some alcohol and clean the arm's recessed
connector.
3) If a new install, check the leads going to the cartridge. People
frequently make a mistake here.
4) Headshell leads can become intermittent. They are usually crimped
leads. Try wiggling each to see if that restores connection.
External Causes
1. The cartridge may possibly be wired wrong. Check that the leads in the
headshell are going to the correct pins on the cartridge.
2) Again very rarely, but it has happened, there is a film or some contaminant,
who knows, that is on the 4 little pints at the back of the headshell. Try
removing the headshell and just rubbing the pints on a piece of cloth a few
times to clean them and replace the headshell.
3) The leads in the headshell are crimped on. Very rarely, but it has happened
over the years, a crimp looked good, but there was no real connection. Just
giving them a wiggle could restore connection. If another known-good
cartridge/headshell is available, try it with the suspect turntable.
4) Last resort check to see if the problem is internal or not: This uses your
body as signal source. Take a small screwdriver and hold the blade by the metal,
or hold a paper clip or wire. Then with the amplifier volume somewhat low,
probe and touch cartridge R and L pins; they are Red and White. You should hear
a buzz out of the respective speakers. Be sure to keep the amplifier volume
at a level that is not too loud. With a good condition turntable wiring, you
will hear a buzz from the L and R speakers when you touch the L and the R pins.
If only one produces a buzz, the problem could be internal.
5) The turntable's output cable connector may not be making good connection at
the amplifier. Remove and replace cable from amplifier. If one channel still
out, reverse R & L cable and replug in. If the problem channel is now reversed,
then the problem is probably inside the turntable or the cable is bad.
6) Check to see if the Vertical/Lateral Switch makes a difference. If the dead
channel comes back in one position or another, then the switch wiring or the
switch itself could be at fault.
Analysis/repair requires removal of the bottom cover. To do this, remove the
platter, and lay the deck, upside-down and a soft surface, like a pad of sponge
rubber, pillow, or a few thick towels. When you remove the Philips head screws,
you may notice that here is a little sleeve on them. If you don't see the
sleeves, that is because they are still in the holes. The best way to retrieve
them is with tweezers. If you don't, they will fall all over when you pull the
cover off.
Inside Causes
The easiest to fix problems are bad solder connections that popped off the
wiring from the printed wiring board to the Vertical Lateral Switch and
associate output cable.
7) If you take the bottom cover off, you will notice that the output cable
connects to the Printed Circuit Board. check to see if any of the wires has
popped off. See how to take the bottom cover off at the article:
CVS-14 & 16 MOTOR PROBLEMS
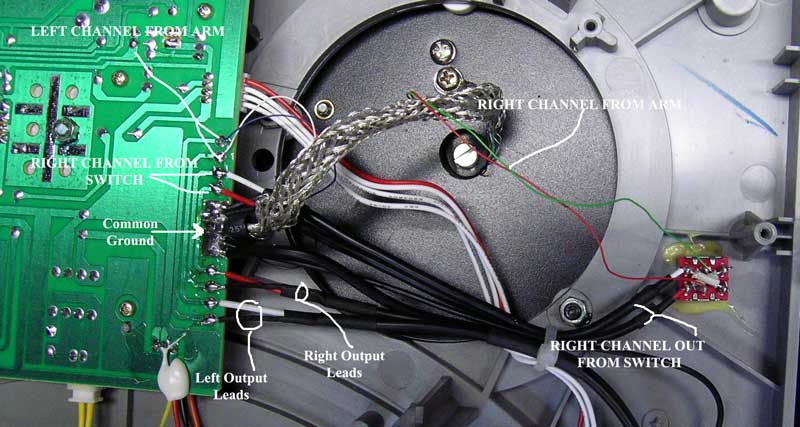
8) Also, check to see if a cable from the switch to the PCB has popped off.
9) check to see if there is a solder short between adjacent pins at the switch.
To resolder or clear solder shorts, requires a small soldering iron that is
normally used for electronics work. A large one used for plumbing could cause a
mess. The cables are "tack soldered," and all you need to do is hold the wire at
the proper PCB wiring pad and just tack it down with the soldering iron tip.
RCA Connector Compatibility
Nowadays there are often mixtures of English and of Metric connector parts.
The simple RCA connectors can sometimes look connected, but are not. To
explain. Sometimes, the diameter of the shield connection of an RCA connector
may actually be a minute fraction of a mm larger than the ring of the jack
into which you are plugging. You will feel normal resistance when pushing it
in, but what you are feeling may simply be that of the center post
connecting. The shield may actually be held by that center post directly in
the middle and the shields are apart by that minute fraction of a mm. The fix
is to pull the plug out and squeeze the connector's shield. You may have to
use pliers to make that circle a tad oval. Then, when you plug it in, it will
definitely make a good ground connection.
If after checking things out, you find that the problems is internal, and you
are skeptical about repairing it yourself, seek professional help.